Posted by kang deden pada 13 Juli, 2007
Add Komunitas Mydeden.Kom On Facebook at : komunitas.mydeden.kom@gmail.com
Berikut ini akan dibahas mengenai bagaimana cara merakit
komputer, terutama bagi mereka yang baru belajar .. dari beberapa
referensi yang saya pelajari .. maka berikut ini akan dijelaskan langkah
demi langkah cara merakit komputer, mudah-mudahan bermanfaat .. Red.
deden
Komponen
perakit komputer tersedia di pasaran dengan beragam pilihan kualitas
dan harga. Dengan merakit sendiri komputer, kita dapat menentukan jenis
komponen, kemampuan serta fasilitas dari komputer sesuai kebutuhan.Tahapan dalam perakitan komputer terdiri dari:A. Persiapan
B. Perakitan
C. Pengujian
D. Penanganan Masalah

Persiapan
Persiapan yang baik akan memudahkan dalam perakitan komputer serta menghindari permasalahan yang mungkin timbul.Hal yang terkait dalam persiapan meliputi:
- Penentuan Konfigurasi Komputer
- Persiapan Kompunen dan perlengkapan
- Pengamanan
Konfigurasi komputer berkait dengan penentuan jenis komponen dan fitur dari komputer serta bagaimana seluruh komponen dapat bekerja sebagai sebuah sistem komputer sesuai keinginan kita.Penentuan komponen dimulai dari jenis prosessor, motherboard, lalu komponen lainnya. Faktor kesesuaian atau kompatibilitas dari komponen terhadap motherboard harus diperhatikan, karena setiap jenis motherboard mendukung jenis prosessor, modul memori, port dan I/O bus yang berbeda-beda.
Persiapan Komponen dan Perlengkapan
Komponen komputer beserta perlengkapan untuk perakitan dipersiapkan untuk perakitan dipersiapkan lebih dulu untuk memudahkan perakitan. Perlengkapan yang disiapkan terdiri dari:
- Komponen komputer
- Kelengkapan komponen seperti kabel, sekerup, jumper, baut dan sebagainya
- Buku manual dan referensi dari komponen
- Alat bantu berupa obeng pipih dan philips

Buku manual diperlukan sebagai rujukan untuk mengatahui diagram posisi dari elemen koneksi (konektor, port dan slot) dan elemen konfigurasi (jumper dan switch) beserta cara setting jumper dan switch yang sesuai untuk komputer yang dirakit.Diskette atau CD Software diperlukan untuk menginstall Sistem Operasi, device driver dari piranti, dan program aplikasi pada komputer yang selesai dirakit.
Pengamanan
Tindakan pengamanan diperlukan untuk menghindari masalah seperti kerusakan komponen oleh muatan listrik statis, jatuh, panas berlebihan atau tumpahan cairan.Pencegahan kerusakan karena listrik statis dengan cara:
- Menggunakan gelang anti statis atau menyentuh permukaan logam pada casing sebelum memegang komponen untuk membuang muatan statis.
- Tidak menyentuh langsung komponen elektronik, konektor atau jalur rangkaian tetapi memegang pada badan logam atau plastik yang terdapat pada komponen.

Tahapan proses pada perakitan komputer terdiri dari:
- Penyiapan motherboard
- Memasang Prosessor
- Memasang heatsink
- Memasang Modul Memori
- memasang Motherboard pada Casing
- Memasang Power Supply
- Memasang Kabel Motherboard dan Casing
- Memasang Drive
- Memasang card Adapter
- Penyelesaian Akhir
Periksa buku manual motherboard untuk mengetahui posisi jumper untuk pengaturan CPU speed, speed multiplier dan tegangan masukan ke motherboard. Atur seting jumper sesuai petunjuk, kesalahan mengatur jumper tegangan dapat merusak prosessor.

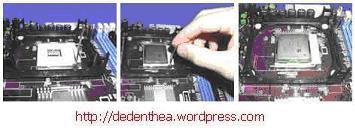
Prosessor lebih mudah dipasang sebelum motherboard menempati casing. Cara memasang prosessor jenis socket dan slot berbeda.Jenis socket
- Tentukan posisi pin 1 pada prosessor dan socket prosessor di motherboard, umumnya terletak di pojok yang ditandai dengan titik, segitiga atau lekukan.
- Tegakkan posisi tuas pengunci socket untuk membuka.
- Masukkan prosessor ke socket dengan lebih dulu menyelaraskan posisi kaki-kaki prosessor dengan lubang socket. rapatkan hingga tidak terdapat celah antara prosessor dengan socket.
- Turunkan kembali tuas pengunci.
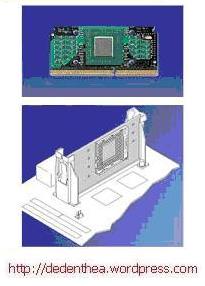
- Pasang penyangga (bracket) pada dua ujung slot di motherboard sehingga posisi lubang pasak bertemu dengan lubang di motherboard
- Masukkan pasak kemudian pengunci pasak pada lubang pasak
Selipkan card prosessor di antara kedua penahan dan tekan hingga tepat masuk ke lubang slot.
Fungsi heatsink adalah membuang panas yang dihasilkan oleh prosessor lewat konduksi panas dari prosessor ke heatsink.Untuk mengoptimalkan pemindahan panas maka heatsink harus dipasang rapat pada bagian atas prosessor dengan beberapa clip sebagai penahan sedangkan permukaan kontak pada heatsink dilapisi gen penghantar panas.Bila heatsink dilengkapi dengan fan maka konektor power pada fan dihubungkan ke konektor fan pada motherboard.

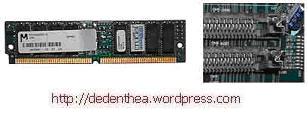
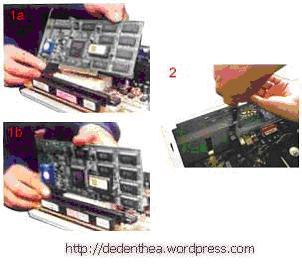
Modul memori umumnya dipasang berurutan dari nomor socket terkecil. Urutan pemasangan dapat dilihat dari diagram motherboard.Setiap jenis modul memori yakni SIMM, DIMM dan RIMM dapat dibedakan dengan posisi lekukan pada sisi dan bawah pada modul.Cara memasang untuk tiap jenis modul memori sebagai berikut.
Jenis SIMM
- Sesuaikan posisi lekukan pada modul dengan tonjolan pada slot.
- Masukkan modul dengan membuat sudut miring 45 derajat terhadap slot
- Dorong hingga modul tegak pada slot, tuas pengunci pada slot akan otomatis mengunci modul.


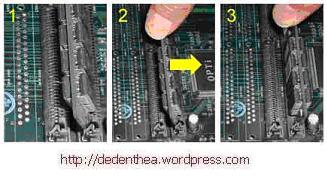
Cara memasang modul DIMM dan RIMM sama dan hanya ada satu cara sehingga tidak akan terbalik karena ada dua lekukan sebagai panduan. Perbedaanya DIMM dan RIMM pada posisi lekukan
- Rebahkan kait pengunci pada ujung slot
- sesuaikan posisi lekukan pada konektor modul dengan tonjolan pada slot. lalu masukkan modul ke slot.
- Kait pengunci secara otomatis mengunci modul pada slot bila modul sudah tepat terpasang.
Motherboard dipasang ke casing dengan sekerup dan dudukan (standoff). Cara pemasangannya sebagai berikut:
- Tentukan posisi lubang untuk setiap dudukan plastik dan logam. Lubang untuk dudukan logam (metal spacer) ditandai dengan cincin pada tepi lubang.
- Pasang dudukan logam atau plastik pada tray casing sesuai dengan posisi setiap lubang dudukan yang sesuai pada motherboard.
- Tempatkan motherboard pada tray casing sehinga kepala dudukan keluar dari lubang pada motherboard. Pasang sekerup pengunci pada setiap dudukan logam.
- Pasang bingkai port I/O (I/O sheild) pada motherboard jika ada.
- Pasang tray casing yang sudah terpasang motherboard pada casing dan kunci dengan sekerup.

Beberapa jenis casing sudah dilengkapi power supply. Bila power supply belum disertakan maka cara pemasangannya sebagai berikut:
- Masukkan power supply pada rak di bagian belakang casing. Pasang ke empat buah sekerup pengunci.
- HUbungkan konektor power dari power supply ke motherboard. Konektor power jenis ATX hanya memiliki satu cara pemasangan sehingga tidak akan terbalik. Untuk jenis non ATX dengan dua konektor yang terpisah maka kabel-kabel ground warna hitam harus ditempatkan bersisian dan dipasang pada bagian tengah dari konektor power motherboard. Hubungkan kabel daya untuk fan, jika memakai fan untuk pendingin CPU.

Setelah motherboard terpasang di casing langkah selanjutnya adalah memasang kabel I/O pada motherboard dan panel dengan casing.
- Pasang kabel data untuk floppy drive pada konektor pengontrol floppy di motherboard
- Pasang kabel IDE untuk pada konektor IDE primary dan secondary pada motherboard.
- Untuk motherboard non ATX. Pasang kabel port serial dan pararel pada konektor di motherboard. Perhatikan posisi pin 1 untuk memasang.
- Pada bagian belakang casing terdapat lubang untuk memasang port tambahan jenis non slot. Buka sekerup pengunci pelat tertutup lubang port lalumasukkan port konektor yang ingin dipasang dan pasang sekerup kembali.
- Bila port mouse belum tersedia di belakang casing maka card konektor mouse harus dipasang lalu dihubungkan dengan konektor mouse pada motherboard.
- Hubungan kabel konektor dari switch di panel depan casing, LED, speaker internal dan port yang terpasang di depan casing bila ada ke motherboard. Periksa diagram motherboard untuk mencari lokasi konektor yang tepat.


8. Memasang Drive
Prosedur memasang drive hardisk, floppy, CD ROM, CD-RW atau DVD adalah sama sebagai berikut:
- Copot pelet penutup bay drive (ruang untuk drive pada casing)
- Masukkan drive dari depan bay dengan terlebih dahulu mengatur seting jumper (sebagai master atau slave) pada drive.
- Sesuaikan posisi lubang sekerup di drive dan casing lalu pasang sekerup penahan drive.
- Hubungkan konektor kabel IDE ke drive dan konektor di motherboard (konektor primary dipakai lebih dulu)
- Ulangi langkah 1 samapai 4 untuk setiap pemasangan drive.
- Bila kabel IDE terhubung ke du drive pastikan perbedaan seting jumper keduanya yakni drive pertama diset sebagai master dan lainnya sebagai slave.
- Konektor IDE secondary pada motherboard dapat dipakai untuk menghubungkan dua drive tambahan.
- Floppy drive dihubungkan ke konektor khusus floppy di motherboard

Card adapter yang umum dipasang adalah video card, sound, network, modem dan SCSI adapter. Video card umumnya harus dipasang dan diinstall sebelum card adapter lainnya.Cara memasang adapter:
- Pegang card adapter pada tepi, hindari menyentuh komponen atau rangkaian elektronik. Tekan card hingga konektor tepat masuk pada slot ekspansi di motherboard
- Pasang sekerup penahan card ke casing
- Hubungkan kembali kabel internal pada card, bila ada.
- Pasang penutup casing dengan menggeser
- sambungkan kabel dari catu daya ke soket dinding.
- Pasang konektor monitor ke port video card.
- Pasang konektor kabel telepon ke port modem bila ada.
- Hubungkan konektor kabel keyboard dan konektor mouse ke port mouse atau poert serial (tergantung jenis mouse).
- Hubungkan piranti eksternal lainnya seperti speaker, joystick, dan microphone bila ada ke port yang sesuai. Periksa manual dari card adapter untuk memastikan lokasi port.

Komputer yang baru selesai dirakit dapat diuji dengan menjalankan program setup BIOS. Cara melakukan pengujian dengan program BIOS sebagai berikut:
- Hidupkan monitor lalu unit sistem. Perhatikan tampilan monitor dan suara dari speaker.
- Program FOST dari BIOS secara otomatis akan mendeteksi hardware yang terpasang dikomputer. Bila terdapat kesalahan maka tampilan monitor kosong dan speaker mengeluarkan bunyi beep secara teratur sebagai kode indikasi kesalahan. Periksa referensi kode BIOS untuk mengetahui indikasi kesalahan yang dimaksud oleh kode beep.
- Jika tidak terjadi kesalahan maka monitor menampilkan proses eksekusi dari program POST. ekan tombol interupsi BIOS sesuai petunjuk di layar untuk masuk ke program setup BIOS.
- Periksa semua hasil deteksi hardware oleh program setup BIOS. Beberapa seting mungkin harus dirubah nilainya terutama kapasitas hardisk dan boot sequence.
- Simpan perubahan seting dan keluar dari setup BIOS.
Penanganan Masalah
Permasalahan yang umum terjadi dalam perakitan komputer dan penanganannya antara lain:
- Komputer atau monitor tidak menyala, kemungkinan disebabkan oleh switch atau kabel daya belum terhubung.
- Card adapter yang tidak terdeteksi disebabkan oleh pemasangan card belum pas ke slot/
LED
dari hardisk, floppy atau CD menyala terus disebabkan kesalahan
pemasangan kabel konektor atau ada pin yang belum pas terhubung.
Selamat Mencoba dan Semoga Bermanfaat.
Sumber : www.google.com Posted by kang Deden on July 13, 2007 Add Community Mydeden.Kom On Facebook at: komunitas.mydeden.kom @ gmail.com The following will be discussed on how to assemble a computer, especially for those just learning .. from a few references that I learned .. then the following will be explained step by step how to assemble a computer, hopefully useful .. Red. Deden Components of computer assemblers are available on the market with a wide selection of quality and price. By assembling your own computer, we can determine the type of component, capabilities and facilities of the computer according kebutuhan.Tahapan in computer assembly consists of: A. Preparation B. Assembly C. Testing D. Troubleshooting
Preparation Good preparation will facilitate the assembly of the computer and avoid possible problems related timbul.Hal in preparation include: Computer Configuration Determination Kompunen preparation and equipment Security Computer Configuration Determination Configuring the computer hooked up with the determination of the components and features of the computer and how all components work as a computer system at will kita.Penentuan components starting from the type of processor, motherboard and other components. Factors suitability or compatibility of the components on the motherboard must be considered, because each type of motherboard supports the type of processor, memory modules, ports and I / O bus that is different. Preparation Components and Supplies Computer components and equipment for the assembly is prepared for the assembly prepared in advance to facilitate assembly. Prepared equipment consists of: Computer components Completeness of components such as wires, screws, jumpers, screws, etc. Manuals and reference books of the components The tools in the form of flat and philips screwdriver Software operating system, device drivers and application programs.
The book takes as a reference manual to know the position of the element connection diagram (connectors, ports and slots) and element configuration (jumpers and switches) and how to setting jumpers and switches are suitable for computer or CD dirakit.Diskette Software needed to install the Operating System, device driver from the device, and application programs on a computer that is assembled. Security Security measures needed to avoid problems such as damage to components by static electric charge, fall, or spill cairan.Pencegahan excessive heat damage due to static electricity by:
Using anti-static bracelet or touch the metal surface on the chassis before handling components to remove static charge. Do not touch directly the electronic components, connectors or circuit track but holding the metal or plastic body found on the component.
Assembly Stage of the process on a computer assembly comprising: Preparing the motherboard Replacing the Processor Install the heatsink Replacing the Memory Module install the motherboard on the casing Replacing the Power Supply Replacing the Motherboard Cables and Casing Install the Drive Install the adapter card Final Settlement
A. Preparing the motherboard Check the motherboard manual to locate the jumper settings for CPU speed, speed multiplier and input voltage to the motherboard. Set a jumper in the blanks, set the jumper fault voltage can damage the processor.
2. Replacing the Processor More easily be installed before the processor motherboard occupies the casing. How to install the processor socket and the slot type socket berbeda.Jenis Determine the position of pin 1 on the processor and the processor socket on the motherboard, generally located at the corner marked with dots, triangles, or indentations. Enforce the position of the locking lever to open the socket. Insert the processor into the socket by first aligning the position of the legs of the processor with the socket holes. Squeeze until there are no gaps between the processor with the socket. Lower the locking lever back.
Slot Types Replace buffer (bracket) at the two ends of the slots on the motherboard so that the position of the peg holes with a hole in the motherboard meet Insert the pegs on the peg and locking peg holes Slide the card between the retaining processor and press into the hole to the right slot.
3. Replacing the Heatsink Function of heatsink is to remove the heat generated by the processor through the conduction of heat from the processor to optimize heat transfer heatsink.Untuk the heatsink should be fitted tightly on the top of the processor with some of the retaining clip on the heatsink while the contact surface coated conductor genes panas.Bila equipped with a fan heatsink then the power connector on the fan is connected to the fan connectors on the motherboard.
4. Replacing the Memory Module Memory modules are generally installed in order from smallest socket number. The order of installation can be seen from the diagram motherboard.Setiap type of memory module that is SIMM, DIMM and RIMM can be distinguished by the position of the grooves on the sides and bottom of the modul.Cara set for each type of memory module as follows. Type of SIMM Adjust the position of a notch on the module with the bumps in the slot. Insert the module by making an oblique angle of 45 degrees to the slot Push the module straight up in the slot, the locking lever on the slot will automatically lock the module.
Type of DIMM and RIMM How to install the DIMM and RIMM modules together and there's only one way that will not be reversed because there are two grooves as a guide. The difference in DIMM and RIMM position of the curve Lay the hook on the end of the locking slot adjust the position of the grooves on the connector module with the bumps in the slot. and insert the module into the slot. Latch automatically locks the module in the right slot when the module is installed.
5. Replacing the motherboard on the casing Motherboard mounted to the chassis with screws and holder (standoff). Installation the following ways: Determine the mounting position of the hole for each plastic and metal. Holes for the metal holder (metal spacers) characterized by a ring on the edge of the hole. Attach metal or plastic holder on the tray casing according to the position of each corresponding mounting holes on the motherboard. Place the motherboard on the tray so that the head casing holder out of the holes on the motherboard. Replace the locking screw on each metal holder. Attach frame I / O ports (I / O sheild) on the motherboard if any. Replace the casing tray that is mounted on the motherboard with screws and lock casing.
6. Replacing the Power Supply Some kind of casing is equipped with power supply. When the power supply installation is not included then the following ways: Insert the power supply on the shelf at the back of the casing. Attach the four locking screws. Connect the power connector from the power supply to the motherboard. ATX power connector types have only one way of installation so as not to be reversed. For non-ATX type connector with a separate two-wire the black ground wires should be placed side by side and mounted in the center of the motherboard power connector. Connect the power cord for the fan, if using a fan for cooling the CPU.
7. Replacing the Motherboard Cables and Casing Once the motherboard is installed in the casing next step is to install the cable I / O panel on the motherboard and the casing. Connect the data cable for the floppy drive controller on a floppy connector on the motherboard Attach the IDE cable to the primary and secondary IDE connector on the motherboard. For non-ATX motherboard. Pairs of serial and parallel port cable to the connector on the motherboard. Note the position of pin 1 to install. On the back of the casing there is a hole for attaching additional types of non-slot port. Open locking plate screw holes covered lalumasukkan port connector port you want to install and replace the screw again. When the mouse port on the back of the casing is not available then the card must be installed and mouse connectors are connected to the mouse connector on the motherboard. The cable connector from the switch on the chassis front panel, LED, internal speaker and the port is installed in front of the casing when the motherboard. Check the motherboard diagram to locate the proper connector.
8. Install the Drive The procedure to install the hard disk drive, floppy, CD ROM, CD-RW or DVD is the same as follows: Pellet dislodged drive bay cover (space to drive the casing) Enter from the front drive bay with the first set the jumper settings (as master or slave) on the drive. Adjust the position of the screw holes on the drive and the casing and replace the screws holding the drive. Connect the cable to the drive and the IDE connector on the motherboard (the connector is used first primary) Repeat steps 1 samapai 4 for each installation of the drive. If the IDE cable connected to the du drive jumper settings make sure the differences are both the first drive set as master and the other as slave. Secondary IDE connector on the motherboard can be used to connect two additional drives. Floppy drive is connected to a special connector on the motherboard floppy Connect the power cord from the power supply to each drive.
9. Install the Adapter Card Common adapter card is installed for video cards, sound, network, modem and SCSI adapters. Video card should generally be mounted and installed prior to installing an adapter card adapter lainnya.Cara: Hold the adapter card at the edges, avoid touching the components or electronic circuits. Press the right card to plug into the expansion slot on the motherboard Replace the retaining screw to the chassis card Reconnect the internal cables to the card, if any.
10. Penyelessaian End Replace the chassis cover by sliding connect the cable from the power supply into a wall socket. Plug the monitor into the video card port. Plug the telephone cord into the modem port if any. Connect the keyboard cable and plug the mouse into the mouse port or serial poert (depending on the type of mouse). Connect external devices such as speakers, joystick, and the microphone when the corresponding port. Check the manual of the adapter card to make sure the location of the port.
Testing The new computer is assembled can be tested by running the BIOS setup program. How to do the testing with the BIOS program as follows: Turn on the monitor and system unit. Note the display monitor and the sound from the speakers. FOST program of the BIOS will automatically detect the hardware installed dikomputer. If there are errors then display a blank monitor and the speaker emits an audible as an indication of the error code. Check the reference BIOS code to find an error indication in question by a beep code. If no error occurs then the monitor displays the execution of the POST program. ekan interrupt the BIOS according to the instructions on the screen to enter the BIOS setup program. Check out all the hardware detection by the BIOS setup program. Some settings may have changed in value, especially the capacity of hard drives and boot sequence. Save the changes to the settings and exit BIOS setup. After exiting the BIOS setup, the computer will load the Operating System in accordance with the order of the search settings in the BIOS boot sequence. Insert the bootable diskette or CD containing the operating system to drive the search. Troubleshooting A common problem in computer assembly and handling include: Computer or monitor is not lit, probably caused by a switch or power cord disconnected. Card adapter is not detected due to the installation of card not fitting into the slot / LED of the hard disk, floppy or CD is on hold due to wrong wiring connectors or pins are not connected right. Good luck and I hope helpful.
Sources: www.google.com


0 komentar:
Posting Komentar